Tuesday, May 29, 2012

Handiham World for 30 May 2012

Welcome to Handiham World.


You can do it!  

Listen to this podcast in its entirety here: http://handiham.org/audio/handiham053012.mp3


Today, just as we did last week,  we are going to begin with Troubleshooting 101 as part of our initiative to help new ham radio operators (and even some of us older ones) learn how to do some basic troubleshooting for ourselves. Yes, it can be tempting to ask someone else to do things for us.  This can become a bad habit when it keeps us from learning new things, especially things that we could - with a bit of practice - learn to do for ourselves.  Knowing these basic things can serve us well in the future when no help is available. 

Troubleshooting 101


Let's get to today's troubleshooting question: 
Question: I carry my HT everywhere, and recently I was outdoors when it started to rain.  Luckily I was close to a picnic shelter and was able to stay dry until the rain passed. It did get me thinking about what I would do if my radio did get wet though.  Any ideas?
It is summertime, and we do want to be outdoors, and naturally we want to take ham radio along for the walk! Part of always carrying a radio is the possibility that you - and the radio - will get wet. But there is wet and then there is really soaked. The two are pretty different, but you are probably going to want to act quickly in either case to protect the radio.
Recently I read a story in WIRED about how some really high percentage of cell phone users drop their phones in the toilet.  I think it was something like 25%! Unless you have a waterproof radio, you are probably not going to be able to fish it out of the bowl in time to avoid damage.
Let's assume you have a typical HT that is not marketed as waterproof, submersible, or even water-resistant. It can likely survive a bit of surface moisture, such as getting caught in a rainstorm, as long as you act quickly to get it out of the direct rainfall, power it off, and dry the outside as quickly as possible. It might also be a good idea to remove the battery. If the radio falls into the water, it is a different ballgame. As soon as the radio begins to sink, water pressure increases and forces moisture into the radio's case in a way that does not happen in a simple rainstorm. That means that you have to act very quickly to get the radio out of the water and remove the battery. The next step is to dry the outside of the radio as quickly as possible, then (with the battery still removed), place the radio and battery pack in a dry container with a desiccant, sealing the container so that the moisture is drawn out of the radio by the desiccant. Are you wondering what a desiccant is? I am sure you have run across those little packets of silica gel that are sometimes packed with electronic devices. They remove humidity that might damage the electronics. If you don't have silica gel packets handy (most of us just throw them away because they have a finite life anyway), you can put the radio in a container with uncooked rice overnight. The rice will help to draw moisture out of the electronics. When you dig the HT out of the rice in the morning, put it on a nice, dry paper towel. Is there any sign of moisture still on the towel? If so, you might need to repeat the rice treatment. In any case, you will not be powering up the radio for days - that means keeping the battery out. You want to make sure that the radio is completely dry before putting the battery back in. If you can perform the drying out procedures in an environment with already low humidity, that is best. An air-conditioned, dehumidified house trumps a humid garage workbench. I would avoid using a hair drier to try to heat the radio. You do not want to add heat that can speed up chemical reactions or damage the electronics or even melt the case. I would not want to try the radio for at least a week so that I was darned sure all the water was out.
Let's consider the best plan of all: prevention. It is much better not to have to dry out a wet radio, so we want to follow some basic procedures to keep our electronics dry, rain or shine. If you take your HT everywhere, always keep a small plastic bag in your pocket. The plastic bag can be used to stow your electronics should you get caught in a downpour. Since I have my little doggie Jasper with me when I am out walking, a dog waste bag does the job of radio protector in an emergency. These bags come in little rolls and are available anywhere pet supplies are sold, or you can just stuff a zip-style plastic food bag into a pocket. If you are boating or in a wet environment, you can just store the HT in a plastic bag when it is not in use.
You should also plan ahead, developing good habits when around water. Keep your HT in a case that will keep it from falling out. If you keep it in a pocket, be sure it is a pocket that is deep enough to keep it from working its way out when you sit down. One danger of using pockets instead of a belt clip and case is that you can forget your cell phone or HT in that pocket and run it through the washing machine. Don't laugh - it happens! If you do use pants pockets for your radio and phone, get in the habit of quickly patting each pocket when changing clothes so that you will feel the HT or phone and remember to remove it. At Dayton earlier this month I was using the restroom in Hara Arena and there was some guy sitting in one of the stalls having a phone conversation on his cell phone. Not only is this kind of clueless socially, it is also the reason cell phones go for a swim in the toilet. Never use your HT or phone in the bathroom, because the bathroom has more water hazards than the golf course after a thunderstorm. Similarly, it is best to keep the HT somewhere away from the kitchen counter, another place where spills happen and are even expected.
Finally, there is the drenching in something other than plain water. I'm afraid there is not much you can do about a radio that takes a salt water swim or a hot coffee bath. If disaster happens, the procedure is the same: remove from the liquid as quickly as possible while watching out for your own safety, take out the battery, and dry out as quickly as possible with absorbent towels on the outside and the dry rice treatment. Hopefully salt has not penetrated the radio, but if it has there may not be much you can do. The salt deposits left behind can become conductive in high humidity conditions, causing shorts. I am not a fan of disassembling electronics to give them a cleaning with distilled water or solvent, as that is a job for trained bench technicians. Considering the cost of bench time, it is likely that a salt water swim will mean it is cheaper to buy a new radio. Similarly, a drenching with sugar-infused soft drinks can leave a real mess of residue behind. If this mess gets onto circuit boards it can also absorb moisture and cause shorts, even after the drying out process. It will also gum up push buttons on the HT's keypad. The bottom line: Don't have your HT anywhere near such possible spills in the first place. If one does occur, follow the emergency procedure:
  1. Remove the radio as quickly as possible from the spill.
  2. Remove the battery.
  3. Blot the surface with a fresh paper towel or other absorbent cloth.
  4. Dry in a container of uncooked rice.
While your gooped-up radio is drying out, you can start shopping for a new one.  It never hurts to be prepared for the possibility that your old HT is down for the count.
Email me at handiham@couragecenter.org with your questions & comments.   
Patrick Tice, WA0TDA
Handiham Manager

A dip in the pool


It's time to test our knowledge by taking a dip in the pool - the question pool, that is! 

Today we are busting our brains with a question from the Extra Class pool:

E5C16 asks: "In polar coordinates, what is the impedance of a circuit that has an admittance of 7.09 millisiemens at 45 degrees?"
Possible answers are:
A. 5.03 E-06 ohms at an angle of 45 degrees
B. 141 ohms at an angle of -45 degrees
C. 19,900 ohms at an angle of -45 degrees
D. 141 ohms at an angle of 45 degrees
Now, you may be asking yourself, "Why should I worry about this particular question when the current question pool is only good until the end of June?"
The answer about why you should understand this question (and more importantly the answer) is that it is exactly the same question, including the question number, that appears in both the current pool AND that brand-new pool!
We can't go into super-detail about how to work these out, but you can find the process easily enough in the ARRL or Gordo books or in the Handiham audio lecture series.
Briefly, here is the skinny:o Ohms at such and such an angle. If you have forgotten what admittance is, it is simply the reciprocal of impedance. If you don't know what impedance is, you need to go back and hit the books. Anyway, here is how such a conversion works:
  • The absolute value of Z (the impedance) equals 1 over .00709 (which is the 7.09 milliseimens converted into seimens by moving the decimal point three places to the left. The "1 over" part comes from the fact that we are working with a reciprocal, which means we flip the numerator and the denominator to get "1 over some other number", which is a reciprocal. 
  • With me so far?
  • Good; so now you just divide 1 by .00709 using your calculator. You get 141.0437 etc., etc., so you round that to 141 ohms.
  • You look at the question and the possible answers again. Hey, answers B & D each have 141 in them!  Now you have a 50-50 chance of guessing which one is right!
  • But the question specifies "...at 45 degrees", and we have done nothing with that number yet. We need to consider that phase angle "theta" equals zero degrees minus the 45 degrees we have been given. So zero minus 45 equals minus 45 degrees. 
  • Now we look at our two possible choices. Answer B is the one that says 141 ohms at an angle of -45 degrees, while answer D says 141 ohms at an angle of 45 degrees. Because you have cleverly subtracted 45 from zero to get -45 degrees, you pick answer B, 141 ohms at an angle of -45 degrees. 
Here is a little memory trick: Always remember that admittance questions involve a reciprocal, you you are going to be dividing some small number into one. It will be expressed as one over the other number. You need to remember to convert to seimens by moving the decimal point. Then if the angle you are given is positive, such as 45 degrees, the final answer will likely be negative, such as -45 in this case. The reason for all this angle stuff is that we are not dealing with direct current. We are dealing with alternating current, which is always changing, so we have to pick a point in its alternating cycle where our specifications can be listed numerically.

Wednesday, May 23, 2012

Handiham World for 23 May 2012

Welcome to Handiham World.


You can do it!  

Today, just as we did last week,  we are going to begin with Troubleshooting 101 as part of our initiative to help new ham radio operators (and even some of us older ones) learn how to do some basic troubleshooting for ourselves. Yes, it can be tempting to ask someone else to do things for us.  This can become a bad habit when it keeps us from learning new things, especially things that we could - with a bit of practice - learn to do for ourselves.  Knowing these basic things can serve us well in the future when no help is available. 

Troubleshooting 101


Let's get to today's troubleshooting question: 

Question: This question has to do with my workshop. Let me explain; over the years I have collected quite a few electronic parts and lots of hardware used in electronics and computers. While I have built some projects in the past and have done some repairs on various pieces of equipment, it seems like I seldom use many of these parts that I have saved up. My wife told me that the basement is getting to be kind of a mess and that I should clean out some of the "extra junk" from my shop. My question is, "How does one decide what to keep and what to throw away?"

Interestingly enough, I was just thinking about this very problem recently. It seems like whenever I have to work on something in my own shop, almost invariably I will have to go out and buy something to complete the repair or project. I am almost never able to pick something out of my junk box and make it work. Since I have been an amateur radio operator for decades, I have saved up a collection of really good stuff that I am possibly going to use some day – for something. The problem is that I have stuff that has been in the same place in the shop for 20 years and has never been touched. Now, you may be thinking that my workshop is such a mess that I just can't find anything. That is not the case. I pretty much know where things are, but I just don't seem to ever need them for a project or repair even though that is the reason I am keeping them.

Does any of this sound familiar?

I'll bet it does; just about every other amateur radio operator does exactly the same thing. We might find an interesting treasure at a hamfest or swap meet, but we really don't know what we would do with it other than use it for a project that never seems to materialize. So to answer the question, you need to come to terms with the reality of the situation. Let's lay it out and be as honest as possible:
  • Technology advancement: Technology has marched on, but your junk box collection has not. The fact of the matter is that most of the stuff you have collected might have been good for fixing electronic equipment that was in vogue 20 years ago or more. Today's electronics use different kinds of parts and sometimes are not even user-repairable. Those vacuum tubes and wire wound resistors in that box underneath the workbench are probably not going to be much good to anyone but a person who restores old radios. If you are not such a person, then it is time to get rid of those kinds of parts. I could go on about other parts for radios and computers, but you get the general idea. If it is not likely to be used in current technology, get rid of it. 
  • Time is limited: Be honest about your time. You do not have unlimited time. You're busy, perhaps busier than you have ever been, especially if you are still in your working years and are raising a family. Do you really have time to work on projects that will take many hours or even weeks or months to complete? It may be better to pare down your collection of project parts and keep only the most essential. Your reward for doing this is a tidier shop and less clutter. This will make it easier to do the projects that you do actually have time to complete.
  • Your interests have changed: At one time you were interested in packet radio and by gosh, you still have that old terminal node controller on the shelf. Along with that, there is an old computer that used to run DOS and that would be "perfect" for your packet station. After seeing a club program about rhombic antennas, you decided to start collecting wire to make that rhombic antenna someday. Of course, you are also interested in getting several of those old computers you have saved back into service. Maybe you can put Linux on them. Well, guess what? If you haven't done anything with these items for several years, your interests have probably changed and you are not likely to get around to any of these projects – ever. Give as much of this stuff away as possible and recycle the rest. Most counties and municipalities have some kind of recycling program for computers and electronics.
Just how honest can you be with yourself? After years of collecting all this junk, it can be difficult to admit that you are never going to get around to using any of it and that you are better off just getting the workshop cleaned out and tidied up so that you will have more space to work and less clutter.
Over the years I have seen some real junk collections. A few of them have been jaw-droppingly amazingly enormous collections worthy of being a swap meet in and of themselves. I could never imagine how anyone could have deluded themselves to the point that they actually believed all of this stuff would someday be useful! It would've been impossible for the person to use half of this stuff in two lifetimes, let alone one lifetime. One guy, an elderly gentleman, had a basement full of shelves arranged in rows, all stacked with equipment and parts at least 30 years old. Another had a basement and an additional storage building with row upon row of shelves holding old parts and radio gear. It is not as uncommon as you might think.

We have to face up to the fact that keeping things simple, actually expedites project-building and troubleshooting. When you have too much stuff, you waste time moving it around or digging through it to find some little part you think you might have. This is usually not worth the time and effort. You are better off buying a new part that will be exactly the right one when you need it. Furthermore, too much junk and clutter can make you prone to simply putting off a troubleshooting project because it is too much effort to work in your shop. If that is the case, you REALLY need to do some serious organizing.

At Radio Camp we will be talking about the essentials of a good, efficient home workbench. We won't go into this lean and mean list of shop basics right now, but I will reveal that it is surprising how little one needs to have a really effective troubleshooting and project space.

Email me at handiham@couragecenter.org with your questions & comments.   
Patrick Tice, WA0TDA
Handiham Manager

A dip in the pool


It's time to test our knowledge by taking a dip in the pool - the question pool, that is! 

Today we are taking a question from the Extra Class pool:

E4C09 asks: "Which of the following is most likely to be the limiting condition for sensitivity in a modern communications receiver operating at 14 MHz?"

Possible answers are:

A. The noise figure of the RF amplifier
B. Mixer noise
C. Conversion noise
D. Atmospheric noise

Long ago, when receivers used vacuum tubes and discrete components and when a VFO could drift like a rowboat in a hurricane, we reveled in the "good old days" of radio.  Yes, these were the times when we sometimes listened with our hand on the tuning knob, either to follow a drifting signal or to try to find a sweet spot where we might hear a signal through all the noise.  In retrospect, they were really "the bad old days", because our equipment is so much better now.  Receivers are so good that they have noise figures below noise that would occur naturally in the atmosphere and stability that rivals crystal control. Thanks to these advances atmospheric noise is now the biggest worry, so answer D is correct. In essence, engineers have done everything possible to the receiver itself to eliminate internally generated noise. It's hard to do much about atmospheric noise, but now modes of operation have evolved to fight back against poor conditions.  PSK-31, for example, is amazing - it works even on days when you would be hard pressed to hear a CW signal. As far as receivers go, if you are looking for the good old days, we are living in them right now!

Wednesday, May 16, 2012

Handiham World for 16 May 2012

Welcome to Handiham World.


You can do it!  
Today, just as we did last week,  we are going to begin with Troubleshooting 101 as part of our initiative to help new ham radio operators (and even some of us older ones) learn how to do some basic troubleshooting for ourselves. Yes, it can be tempting to ask someone else to do things for us.  This can become a bad habit when it keeps us from learning new things, especially things that we could - with a bit of practice - learn to do for ourselves.  Knowing these basic things can serve us well in the future when no help is available. 

Troubleshooting 101


Let's get to today's troubleshooting question: 
I sometimes use my handheld radio in the car.  I can hear the repeater just fine, but I have had complaints that other stations can't hear me.  What's going on here?  Is there something wrong with my HT?
Yes, I'm afraid there is a problem with your radio. The problem is that it has a terrible antenna.  Before you complain that the radio has always worked quite well when you used it around the house, let me explain.
Handheld radios are meant to be portable so that they are easy to carry around.  Haven't you noticed that people prefer smaller, lighter electronic devices?  So what was once referred to as "a brick" - the venerable 2 meter HT - has evolved to a multiband miniaturized wonder that fits in the palm of your hand.  The antenna on the old brink was just about the same length as the one on your new radio, though.  These flexible "rubber duck" antennas are the ones that come as standard equipment with a new handheld radio.  They have always been terrible antennas, but they are designed to be flexible so that they can bend without breaking and generally survive being dumped into a backpack, stuffed into a pocket, or crammed into a purse.  A quarter-wave antenna for the 2 meter band should be around 19 inches long (48 cm), but the radio would hardly be portable with that big antenna, would it? The rubber duck antenna is inductively loaded so that it can be physically shorter but still act like an electrical quarter wave. 
This seems like a great solution because now you have the equivalent of 19 inches of antenna in a tiny, convenient flexible stick.  Ha, ha, that is a good one.  Most of these rubber antennas are more like a "dummy load on a stick".  They are inefficient and lossy. A rubber antenna that came with the HT is probably okay if you are in a good location and not far from the repeater and are not moving around. The rubber antenna can receive okay but is not going to win any awards, but transmitting efficiently is just plain not a happening thing. When you move the antenna around, every slight cancellation of signal from multipath reception becomes a near-dropout.  It is even worse inside a car, where the body of the car can block part of the signal and you are nearly always moving.  No wonder your friends are complaining about your signal - because it is terrible!
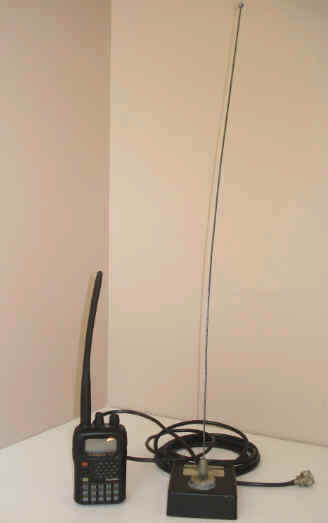
Yaesu HT and Larson quarter wave mag mount antenna side by side on a shelf.
I placed my tiny Yaesu VX5R HT with the somewhat bent from years of carrying it in my pocket next to an old Larson 1/4 wavelength magnet mount antenna.  The ACTUAL quarter wave mag mount towers over the HT with its wimpy rubber antenna.  If only there were a way to use a quarter-wave magnet mount antenna, or even a 5/8 wavelength mag mount antenna, with my HT it would sure solve my transmitting problem and make the HT more useful as a temporary mobile radio.
Of course there is a way; you just need to get the right adapter to mate the mag mount antenna's connector to your HT and you are in business, right?
Well, no - it's not quite that easy.  For one thing, you might not have a mag mount antenna.  And you may not be familiar with these kinds of temporary antennas, especially if you are not a driver yourself and you ride with a spouse or a friend.  Here are some things to consider:
  • If you are going to move the antenna around a lot, such as using it on a friend's car then removing it after you get where you are going, there are tiny, highly-portable miniature mag mount antennas with small diameter coax (RG-174U) with a connector to fit directly onto your HT.  Actually, I prefer these antennas over other mag mounts because the light, flexible coax will not put extra stress on your radio's SMA connector.  MFJ makes the MFJ-1722 dual-band mag mount antenna and it is only around $15 - an accessory to your HT that is well worth the money.  
  • If you already have a more conventional larger mag mount with RG-58 coax, I recommend an adapter with a short piece of RG-174U coax so that the flexibility of the cable allows for comfortably moving the HT about as you use it.  Stiff coax will put excessive pressure on the HT's antenna connector and may eventually break it.  
  • If you are using an HT with an SMA connector, you may want to consider a special connector adaptor that seats against the body of the radio, taking pressure off the antenna connector. 
  • Pay attention to the routing of the feedline out the door.  It may run through the gap between the door and the car's frame, but choose a spot where the rubber gasket around the door frame will close gently against the wire. 
  • Avoid sharp bends when running coax.
  • For longer term installations, test the water seal around the coax entry point with a garden hose.  
  • Place the antenna on the roof of the vehicle or on the deck of the trunk lid if the cable is to be run through the back seat and out into the trunk.  
  • Be sure the magnet has a serious grip on the metal car body!
  • Avoid long, flapping runs of wire across the roof or trunk. 
  • If you have an antenna that screws onto a magnetic base, be sure it is screwed on tightly before traveling!
  • Consider a small, easy to remove antenna that is placed just outside and above a back door.  You can easily grab it off the roof and shove it on the back seat floor under a mat when you want to conceal the fact that you have a radio in the car or if you need the extra clearance to get into the garage. While you're at it, unhook the HT and put it in the glove box or take it with you. 
  • If you are serious about using an HT in the car, you might also pop for the optional car charger.  All the HT manufacturers offer them, and they can be in the glove box with an extra rubber duck antenna when not in use. You will likely need high power while operating mobile, and that can run your battery down quickly.
Once you start using a "real" antenna mounted outside the vehicle, you will wonder how you ever got by with an HT and the rubber antenna. 
Email me at handiham@couragecenter.org with your questions & comments.   
Patrick Tice, WA0TDA
Handiham Manager

Wednesday, May 09, 2012

Handiham World for 09 May 2012

Welcome to Handiham World.


You can do it!  
Today, just as we did last week,  we are going to begin with Troubleshooting 101 as part of our initiative to help new ham radio operators (and even some of us older ones) learn how to do some basic troubleshooting for ourselves. Yes, it can be tempting to ask someone else to do things for us.  This can become a bad habit when it keeps us from learning new things, especially things that we could - with a bit of practice - learn to do for ourselves.  Knowing these basic things can serve us well in the future when no help is available.  

Troubleshooting 101


Let's get to today's troubleshooting question: 
I like using Echolink, and I've finally figured out how to forward the ports on my home router to my ham shack computer.  The problem is that I can't use Echolink on any other computer in the house unless I change all those port forwarding settings or use a public proxy, which isn't always available.  Is there anything else I can do to make Echolink a little more convenient?
Echolink is pretty addictive, and it's easy to understand why you would want to be able to use it all around the house, perhaps even on your laptop while seated out on the patio one of these nice upcoming summer days. As you discovered, when you set up your home router to forward ports as described on the Echolink website, the application will then only work on the computer you selected.  The router will happily direct traffic through those open ports, but only to that one specific ham shack computer.  As you discovered when setting up your home router, port forwarding is not something you can do on a moment's notice.  You have to log into your router's web-based administration page, go to the advanced settings, and then the port forwarding section. When you make changes to the settings, the router may momentarily drop internet connectivity and perhaps even reboot.  Then it will take a while for everything to settle down and work again.  This can be a major aggravation if you have other users in your household or if your home phone is a VoIP system that depends on the internet being connected. 
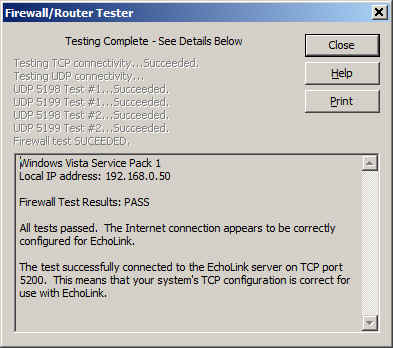
Let's examine our Echolink application's built-in Firewall test.  You will find it by opening Echolink, going to the "Tools" menu, and arrowing to the "Firewall/Router Test". Once there, press and the test runs automatically.  If you are blind or just like keyboard commands because they are faster and better than the mouse anyway, simply press and the letter "T" for the Tools menu, then and the letter "F" for the Firewall/Router test, which will start immediately. 
Since you have already told us that your ham shack computer has Echolink working, you should get this "Testing Complete" message that says "Firewall test results: PASS". 
"Firewall test results: PASS".
It is important to know about this handy little tool that is built into Echolink because you are going to use it again on a fairly regular basis once you make a few simple changes to your router settings.  
Now it is time to use your main computer, which is connected by a LAN cable (preferably) to the router, to open the router's administration page. Depending on your router's setup, you will need to log in, then go to the advanced settings page and then to the port forwarding page.  This should all seem familiar as you have already done it once.  Next, you will need to uncheck the port forwarding boxes that you already set up.  Yes, I know it seems crazy, but it is a necessary step. Save the settings, then go back to the advanced settings page and choose "port triggering" or "application rules" this time.  It is similar to setting up port forwarding, but there is a BIG difference:  You are opening ports when the Echolink application calls for them to carry traffic, no matter which computer on your network is running Echolink.  This means that when you open Echolink on your wireless laptop while on the patio, the ports will be open to that computer.  When you close Echolink on the laptop and later that evening you go back into the ham shack to use your main computer, Echolink will then work on that one because the ports will be opened by the "trigger" of a call for traffic to that machine.  
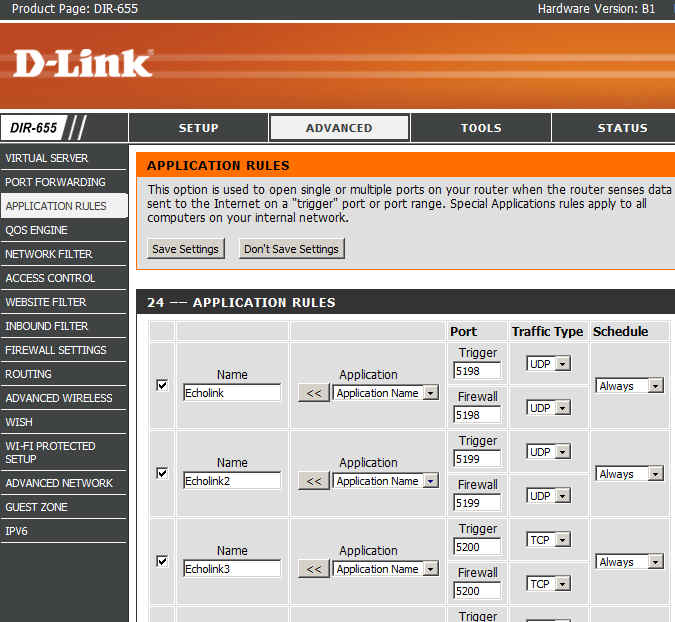
I happen to have a D-Link router, so a screenshot of the application rules (triggering) page shows that I have triggered ports 5198 and 5199 for UDP traffic and port 5200 for TCP traffic.  
I have triggered ports 5198 and 5199 for UDP traffic and port 5200 for TCP traffic.
Now I can save the settings and after that I should be able to use Echolink on any computer on my home network without having to worry about port forwarding.  
There are some things to remember:
  1. Only one computer at a time can be running the Echolink application.  If more than one computer is running Echolink, only one of them will actually connect properly.
  2. When you close Echolink on one computer, it may take a few minutes for the network to resolve itself back to a neutral state.  If you try to connect Echolink on another machine immediately, it may not work.  Always allow a few minutes between switching machines - Both machines may be running and connected to the network at the same time, which is not a problem.  It is only starting Echolink too soon after just closing it on another machine that can cause problems. 
  3. This is where we try our built-in Firewall/Router tests again:
    "Firewall test results: PASS".
    If the network is ready, the tests will proceed normally with a "PASS" and you are good to go for Echolink fun!
Email me at handiham@couragecenter.org with your questions & comments.   But for the record, please remember that I am NOT tech support for Echolink or your home networking equipment since you are there at home and I'm here in Minnesota.  Reading the manual will get you way farther than calling me for sympathetic head-nodding.

Patrick Tice, WA0TDA
Handiham Manager

Wednesday, May 02, 2012

Handiham World for 02 May 2012

Welcome to Handiham World.


You can do it!  
Today, just as we did last week,  we are going to begin with Troubleshooting 101 as part of our initiative to help new ham radio operators (and even some of us older ones) learn how to do some basic troubleshooting for ourselves. Yes, it can be tempting to ask someone else to do things for us.  This can become a bad habit when it keeps us from learning new things, especially things that we could - with a bit of practice - learn to do for ourselves.  Knowing these basic things can serve us well in the future when no help is available.  This next simple exercise is one that we will be practicing at this summer's Radio Camp.  You can do it yourself once you learn a few basics.

Troubleshooting 101


I have my General Class license now, so I decided to put up a vertical antenna, which I ground-mounted, in my back yard. I have checked the SWR (standing wave ratio) and it is practically one to one. It is grounded with a ground rod right near the feedpoint, and I have kept the grounding wire short. I am putting out plenty of power with my 100 watt rig, but I am having a hard time making contacts? What is wrong here?
Vertical antennas have long been the subject of derision in many amateur radio circles. It is practically an article of faith that “a vertical antenna is one that transmits equally poorly in all directions”. These operators have either tried vertical antennas themselves and had a poor experience or (more likely) they have heard some know-it-all pontificating on the awfulness of verticals and the awesomeness of just about any antenna other than a vertical.
Yes, the poor old vertical has gotten a pretty bad reputation. But is it justified?
I say no! And here's why.
The most common vertical antenna design is an electrical quarter-wave long. This means that a simple 20 meter vertical will be on the order of 16 to 17 feet tall (5 meters). There is no problem ground-mounting a vertical in most locations, and this kind of antenna is sometimes disguised as a flagpole in places where there are restrictions on traditional antennas. A ground-mounted vertical will certainly have other advantages, too. It will not require an expensive tower or other supporting structure. It will be easy to install and work on if it needs maintenance or adjustment because you can reach it without any climbing. You can trench the coaxial feedline under the ground to keep it out of the way. If it is mounted in the back yard, it will probably not even be visible from the street. No wonder this simple antenna seems so attractive!
But let's get back to your troubleshooting question. You have done well with your vertical antenna installation as far as it goes, but you have made a common mistake. You have assumed that a ground rod would suffice as a complete grounding system – but it won't. When we work with RF (radio frequency) energy, we must remember that RF grounding is not the same as providing a simple electrical ground for low-frequency AC, DC, or lightning protection. Yes, a good electrical ground is an essential part of a well-designed antenna and feedline system. Now it is time to complete your vertical antenna installation with a good RF ground. That means installing radial wires extending from the base of the antenna outward in all directions. The ground rod should work as a common connection point. The coax braid is connected to the ground rod or the antenna's mounting post, both of which are tied together with a stout, solid conductor.
What is happening in your antenna system is that lots of current is flowing in the vertical element right near the feedpoint. This is normal and expected. There is also a lot of current flowing in the ground beneath and around the antenna, outward in all directions. That is because a quarter-wave vertical is like one side of a dipole system, except that the ground makes up the other half of the dipole. If you recall your General Class studies, you will remember that current in a half wave dipole flows most strongly right near the feedpoint.
Now, answer me this: If you put up a dipole with one leg made of a fully-extended wire and the other a very short wire connected to a big resistor, do you think that dipole would work as well as a dipole with both legs made of wire?
No? Why not?
Well”, you say, “It is obvious that the dipole with a big resistor in it will not work as well because there will be power lost in the resistor. The resistor will heat up, just like a dummy antenna.”
Yes, you are right! In fact, dummy load antennas are really nothing more than resistors designed to dissipate RF energy to keep it off the air while you run tests on a transmitter. A dummy load will have a near-perfect SWR, even though it is a resistor. Just because it has a low SWR does not mean that it is a good antenna. The problem with your vertical antenna system is that it is like that dipole with a resistor in one leg. The ground beneath the antenna has resistance to the flow of RF energy outward in all directions. The soil does have some conductivity, but it depends on moisture and composition. So the ground can be like a resistor. The ground rod you have installed goes straight down and does nothing to help RF flow in all compass directions outward near the surface of the ground.
The fix: A good radial system.
Radial wires are installed like the spokes of a wheel, outward from the grounded side of your antenna's feedpoint. They can be cut to a quarter-wave length for every band you plan to operate (if your antenna is a multiband vertical) or – and this is more practical – to whatever length is convenient to fit into the space you have. Mind you, this goes only for a ground-mounted vertical in an area with normal to good soil conductivity. If you are mounting a vertical over quartz rock with almost no soil, the tuned radials might be necessary. If you are in the USA Midwest with its rich soil, you can probably get by with random length radials in your ground-mounted system. The reason is that conductive soil pretty much detunes the radials anyway, so there is nothing to be gained by carefully measuring them. In fact, since most of the RF current will be flowing right near the feedpoint, it makes sense to provide it with a low resistance path there, close to the antenna.
Why? Think of the formula power dissipated = current squared times resistance. The higher the resistance in the ground, the more power will be dissipated as heat. You don't want that! What you want is for most of the power to be used to make contacts with other stations. The earthworms will be happier, too, because they don't need the extra heat. If most of the current flows in the ground near the antenna, then THAT is where you need to put the most radial wire. I have always simplified this concept when teaching about vertical antennas by using the following practical example:
You have a coil of wire to use for radials. It is 100 feet long and will provide the radial system for your 20 meter band quarter-wave vertical. The question is which of these choices would be better:
A. One long radial that uses all 100 feet of wire.
B. Two 50 foot radials running in opposite directions.
C. Three 33 foot radials spaced 120 degrees apart.
D. Five 20 foot radials spaced at 72 degrees apart.

If you were thinking about losses near the feedpoint, you would probably pick answer D. The reason is that you are putting more wire near where the loss is actually happening! In fact, the thing with radials is “the more, the better”, not “the longer the better”. Of course you would not want to go to extremes and assume that 100 one-foot radials would work. But in the real world, you want to get more wire down in the ground near the feedpoint. A dozen radials work better than four.

Installing and testing the system:
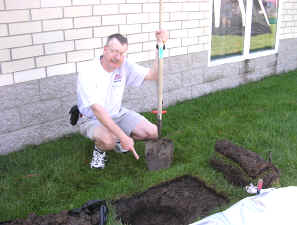
You don't need any special kind of wire for radials, but I recommend a coated (insulated) wire that is not springy and is strong enough to flex multiple times without breaking. Clean off enough insulation to make a good connection to the central grounding point, then run each wire out across the yard, approximating its final position. The wire only need be just beneath the sod. There is no reason to bury it deeper, so you can cut the sod with something like an edge trimmer and just poke the wire down into the cut. Before doing ANY digging, check to be sure you are not going to run into any buried utilities or your lawn's irrigation system.


Stomp the grass back down and you are good to go. Repeat for each radial. If you can go out 33 feet in one direction and only 15 in another, that's okay. Just make sure that the final installation is solidly connected to the ground rod and coax braid and all of the wires are out of the way of the lawn mower. The insulated wire will last longer in the ground than non-insulated wire. Once you get a taste of a hands-and-knees radial installation, you will not be eager to repeat it to replace rotted out wire any more than you have to. And if you tried to install springy radial wire, well, you know what that is like. Push one part in, another part pops out.

When the radial field is in place, a test will include an SWR check. If you find that the SWR has gone UP, you should not be alarmed. The feedpoint impedance of a vertical is generally well below 50 ohms, so it is quite possible that all that loss resistance in the soil had been adding to the impedance to make the end result a better match before than it is now! You should not worry unless the SWR is really high, though. In fact, the somewhat higher SWR is an indication that you have cut ground resistance and improved conductivity, thus increasing your antenna's efficiency. Turn on the rig, try calling some stations, and you will find out that more of your signal is going out onto the air!
Email me at handiham@couragecenter.org with your questions & comments.  
Patrick Tice, WA0TDA
Handiham Manager