Welcome to Handiham World.

You can do it!
Today, just as we did last week, we are going to begin with Troubleshooting 101 as part of our initiative to help new ham radio operators (and even some of us older ones) learn how to do some basic troubleshooting for ourselves. Yes, it can be tempting to ask someone else to do things for us. This can become a bad habit when it keeps us from learning new things, especially things that we could - with a bit of practice - learn to do for ourselves. Knowing these basic things can serve us well in the future when no help is available. This next simple exercise is one that we will be practicing at this summer's Radio Camp. You can do it yourself once you learn a few basics.
Troubleshooting 101

I have set up my Echolink audio and it worked perfectly, but today when I tried using Echolink, the audio was really low or not working at all. What can be done?

Before we say anything more about this, I have to let you know that you are not alone. I like Echolink and use it nearly every day, but I still consider it to be a journey, so to speak. I have not quite arrived yet at the point where Echolink works perfectly each and every time. Audio problems are common and expected, so we have to learn how to troubleshoot them.
Your first test should be a visit to the Echolink Test Server. Find the test server by going to the Station menu (Arrow right from the File menu or use ALT-S) and when you hit "Station", arrow down to "Connect to test server". You should hear the familiar welcome message. After the welcome, get focus in the transmit box, toggle transmit with the space bar, and transmit a short test message. Toggle again and wait for your audio to be echoed back to you. If there is no audio, proceed to the "No Audio" troubleshooting. If there is low audio or too much audio so as to cause distortion, proceed to the "Audio Level" troubleshooting.
No Audio
If there is no audio at all, there are several things to check.
Volume: Is the volume turned up? Are your computer speakers powered up?
Microphone: Is the microphone plugged in? If there is an external microphone, whether USB or the 3.5 mm plug, it may have been unplugged by another user in the family, or you may have unplugged it and forgotten to plug it back in. Some microphones have their own mute buttons. Check to make sure the microphone is not muted. If you are using a microphone headset with 3.5 mm audio plugs, make sure that the headphone plug and the microphone plugs are not reversed. If you use a USB headset, plug it into the same USB port on your computer each time so that the machine does not search for USB drivers each time you plug it in.
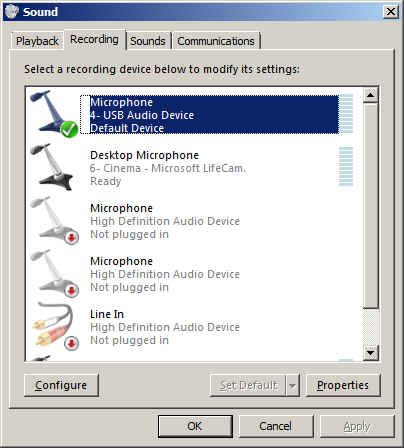
Audio Mixer: The audio mixer in your operating system (usually Windows for Echolink users) might have the microphone either muted or the wrong audio input is selected. Windows users need to go to the Windows Mixer recording settings. Getting there is different depending on your version of Windows. We will not explore this, but it is something you should learn about your own computer and operating system. In the recording mixer settings, unmute the microphone and run the slider up if it is set at zero. Repeat the test server test and it should work fine. You can usually get to the mixer settings via the Echolink application itself. Go to the Tools menu, then arrow down to "Adjust sound device" and choose "Recording". This is an easy way to find the recording mixer!
Multiple audio inputs: As we mentioned, the wrong input may be selected in your Windows mixer. Be sure the correct input for the microphone you want to use is selected as the default device. Again, how you do this may vary depending on your operating system. You should learn how to use your operating system's mixer.
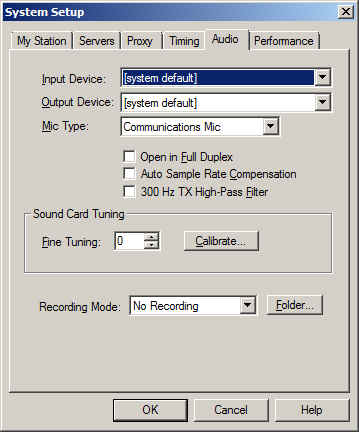
Echolink sound selection: The Echolink application has its own selection of audio input devices available from a pull down menu. You will find it on the audio tab in System Setup. The choices are "Input Device" and "Output Device". If the microphone selection is to be checked, the one you want to pull down is the "Input Device". If you have more than one input device, they should all be listed in the pull down. However, the first item listed is always "system default". That is the one you should select, because if you followed the directions we just gave you, you have already set the preferred microphone to "default device".

So why do we recommend using "default device" instead of one of the other selections? It is because selecting the recording device via the Echolink pull down does not always result in the correct device actually being used for audio input. This is a real mine field for users who have lots of audio devices. A computer could have a TV tuner, more than one microphone, a webcam with a built-in microphone, a line in device, and even a USB audio line to a transceiver. Don't laugh - I have had all of these things, and sometimes Echolink reported one microphone being the input when instead the audio was coming from the HF rig connected via USB. It is safer to set your preferred microphone up as the default device in Windows, then always choose the default device as the Echolink input via the Setup menu.

So why do we recommend using "default device" instead of one of the other selections? It is because selecting the recording device via the Echolink pull down does not always result in the correct device actually being used for audio input. This is a real mine field for users who have lots of audio devices. A computer could have a TV tuner, more than one microphone, a webcam with a built-in microphone, a line in device, and even a USB audio line to a transceiver. Don't laugh - I have had all of these things, and sometimes Echolink reported one microphone being the input when instead the audio was coming from the HF rig connected via USB. It is safer to set your preferred microphone up as the default device in Windows, then always choose the default device as the Echolink input via the Setup menu.
Final test: If you have followed the directions and everything is set up as described, repeat the test server test. Adjust levels if necessary. If there is still no audio, you may have to look further. There could be a fault in your microphone, usually with the cable or plug, or with the computer hardware or sound card drivers.
Low Audio
Microphone selection and positioning: As we already discussed, you must be sure that you are using the correct device. One fellow I know was puzzled by a low transmit audio condition. When I talked with him on Echolink, his audio sounded like he was far away from the microphone, yet he was wearing a headset microphone combo. The diagnosis was that the sound was being picked up by his laptop's built in microphone, which had been selected as the default audio input device. If you are simply too far away from the microphone it can have exactly the same effect. Position the microphone closer to your mouth, keeping it slightly to the side. If the mic element must be very close to your lips, as is the case with headset microphones, use a foam wind screen to prevent puffs from making loud noises as you speak.
Beware of other software that takes over mixer settings: Voice dictation software can change your mixer settings to some predetermined level that is ideal for speech input computing. You may have your Echolink levels just perfect, then you open Dragon NaturallySpeaking®, enjoy a session of typing with your voice, and think nothing of it. But the next time you want to use Echolink, the microphone audio may be very low. This happened to me all the time, because I liked using my USB headset for both voice dictation and Echolink. Dragon would reset the mixer every time, unchecking the microphone AGC boost and changing the slider level. It might be best to select different input devices for these two software applications so one does not fight it out with the other for mixer level settings.
Mixer settings continued: Most of us will not use anything but the built-in software mixer, but there may be some users who use external hardware mixers. These can be great for those who like to really be in control of their audio. If you have an external mixer, be sure the microphone is plugged in and selected as the input device. Check the sliders to adjust the level. If the device uses external power, be sure it is powered up!
Every computer system is different. It is difficult for someone else to help you with your system, especially on the phone. So I have some "homework" for you. I want you to learn how to use the audio mixer in your own computer, and learn it well enough to set input and output levels. Some computers (probably most these days) have some kind of keystroke combination or actual dedicated keys on the keyboard to raise and lower the volume or mute the audio. Some laptops have a volume control that operates by spinning a wheel or holding down a specific key. You need to learn these controls and learn them well, because they will be used for lots of other applications like taking voice notes, doing voice dictation, playing music, listening to audio books or Internet audio streams, and much more. Wouldn't it be nice to learn the mixer settings so that you don't have to ask for help on these things as well as with Echolink?
Sure, it would! And you can do it.
Email me at handiham@couragecenter.org with your questions & comments.
Patrick Tice, WA0TDA
Handiham Manager
Patrick Tice, WA0TDA
Handiham Manager